
Login & Signup
The authentication page handles login, signup, two-factor authentication, password reset, and email verification — all from a single, animated card interface.
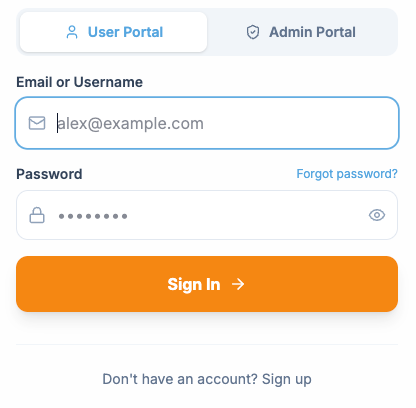
Portal Mode Selector
Section titled “Portal Mode Selector”Before logging in, users choose which portal to access using the toggle at the top of the login form:
- User Portal — The default. Opens the member-facing portal with courses, subscriptions, sessions, and volunteering.
- Admin Portal — For administrators. Requires the
admin_portal_accesspermission.
The selected portal mode is stored in the user’s session token and determines which portal renders after login.
User Portal Login
Section titled “User Portal Login”To log into the User Portal:
- Select User Portal (this is the default)
- Enter your email or username
- Enter your password
- Click Sign In
If your account has two-factor authentication enabled, you will be prompted for a verification code after entering your credentials.
What you need
Section titled “What you need”- A verified email address
- Your password
Admin Portal Login
Section titled “Admin Portal Login”To log into the Admin Portal:
- Select Admin Portal using the toggle
- Enter your email or username
- Enter your password
- Click Sign In
- Complete the two-factor authentication prompt
Requirements
Section titled “Requirements”- Your account must have the Admin or Instructor role
- The
admin_portal_accesspermission must be enabled for your role - Two-factor authentication (2FA) is required — Admin accounts must have 2FA set up and active for security. You will not be able to access the Admin Portal without completing 2FA verification.
If you do not have the required permission, login will be denied with an error message.
Creating an Account
Section titled “Creating an Account”New users can create an account by clicking Sign Up at the bottom of the login form. The signup form is a single page — there is no separate age-verification step.
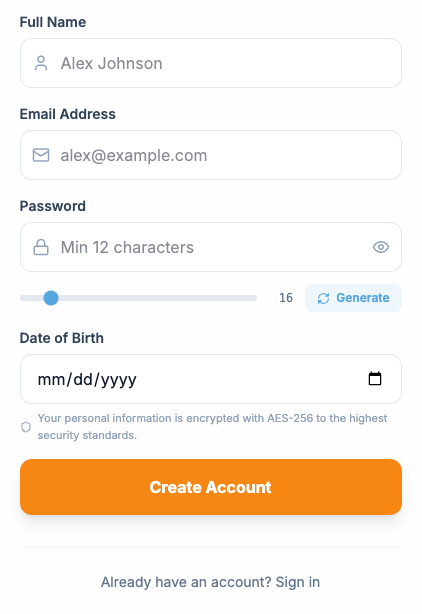
What the Form Asks For
Section titled “What the Form Asks For”| Field | Required | Notes |
|---|---|---|
| First Name | Yes | Used as the friendly display name throughout the portal. Last name is not collected. |
| Username | Yes | 3–12 lowercase letters or numbers. Click the 🎲 Random button to generate one (e.g. bravelion, fluffypanda). The system appends a unique number afterward (e.g. bravelion_142). |
| Email Address | Yes | Used for login, email verification, and account notifications. For users in grade 7 or below, this should be the parent or guardian’s email — see below. |
| Password | Yes | Must meet the strength requirements shown inline (length, uppercase, lowercase, number, special character). |
| Grade | Yes | Choose K through 12, Adult, or Other. This replaces date of birth and drives whether parental consent is required. |
| Emergency Phone | Yes | A phone number we can reach in case of an emergency at our makerspace. |
| Notes | Optional | Anything you’d like the team to know — allergies, accessibility needs, learning goals, etc. |
After submitting, you’ll see a success message asking you to check your email for a verification link.
Parental Consent for Grades K–7
Section titled “Parental Consent for Grades K–7”If you choose a grade between K and 7, the email you provide must belong to your parent or guardian — not your own. Here’s the flow:
- The parent enters their email when filling out the form.
- They click the email verification link sent to that address.
- After verifying, the system sends a separate parental consent email — also to the same address — with a one-click “I consent” link.
- After the parent clicks that link, they receive a welcome email with the child’s username and email so they can share the sign-in details with their child.
The child’s account is not active until both the email verification and the parental consent links have been clicked.
Email Verification Welcome Message
Section titled “Email Verification Welcome Message”For users in grade 8 or above (or Adult / Other), no parental consent is needed. Right after verifying their email, the user receives a welcome email containing:
- Their username (with the system-appended number)
- The email address they used to sign up
- A “Sign In to Portal” button
Save this email — it’s the easiest way to remember your final username.
Email Verification
Section titled “Email Verification”When a user clicks the verification link from their email, the portal handles three states with banners on the login page:
- Verified — Green banner confirming the email was verified. A welcome email is sent at this point (see above).
- Expired — Amber banner indicating the link expired (links are valid for 24 hours).
- Failed — Red banner for invalid or already-used links.
Two-Factor Authentication (2FA)
Section titled “Two-Factor Authentication (2FA)”If a user has 2FA enabled (or it is required for their role), an additional verification step appears after entering their password.
Authenticator Code
Section titled “Authenticator Code”Six individual digit inputs that auto-advance as the user types. Pasting a full 6-digit code is supported.
Recovery Code
Section titled “Recovery Code”If the user doesn’t have access to their authenticator app, they can switch to recovery code mode — a single text input for entering a one-time recovery code.
A warning appears if the user is running low on recovery codes.
Password Reset
Section titled “Password Reset”Accessible via the Forgot Password? link on the login form:
- User enters their email address
- A reset link is sent (expires in 1 hour)
- Success message confirms the email was sent
- The user follows the link to set a new password on a dedicated reset page
Error Handling
Section titled “Error Handling”All error states display a red banner at the top of the form with a descriptive message. Common errors include:
- Invalid credentials
- Account not found
- Email not verified
- 2FA code incorrect
- Admin portal access denied (missing permission or role)
Next Steps
Section titled “Next Steps”- Learn about Roles & Permissions to understand what each role can access
- Explore the User Portal documentation
- Explore the Admin Portal documentation